Passport Photo Lighting Tips
Master lighting for perfect passport photos. Complete guide covering natural light setups, artificial lighting, shadow elimination, and professional techniques you can use at home.
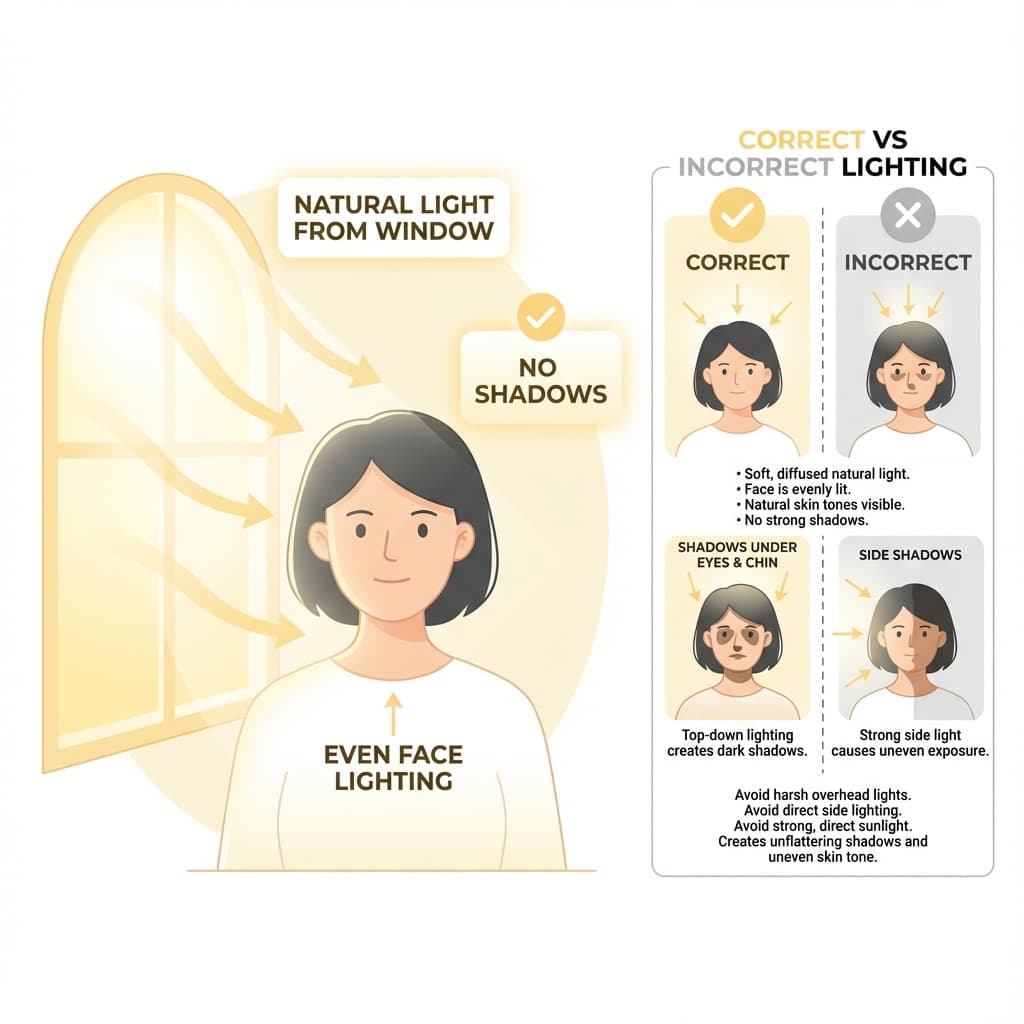
Why Lighting Matters for Passport Photos
Lighting is the single most important factor in taking a quality passport photo. Even the best camera cannot compensate for poor lighting. Bad lighting causes:
A passport photo needs to show your face clearly, with no harsh contrast, no deep shadows, and no color cast that makes your skin look unnatural. When people think a photo failed because of the camera, the real issue is often the light around them. If you fix the light first, everything else becomes much easier.
Common Lighting Problems
- ❌ Shadows on face: Automatic rejection
- ❌ Shadows on background: Automatic rejection
- ❌ Uneven skin tones: Unprofessional appearance
- ❌ Red-eye from flash: Must be retaken
- ❌ Dark or underexposed photos: Rejection
- ❌ Washed-out overexposed photos: Rejection
Natural Light Setup (Recommended)
Natural daylight is the best and easiest light source for passport photos. It is free, produces accurate colors, and creates flattering, even illumination.
The goal is not to stand in bright sun. The goal is to stand in soft daylightthat spreads evenly across your face. A shaded window, a cloudy afternoon, or a room with a large diffused window often gives better results than direct sunlight because the light is gentler and easier to control.
Ideal Natural Light Conditions
- ✅ Large window: The bigger the window, the softer the light
- ✅ Overcast day: Clouds diffuse sunlight perfectly
- ✅ Indirect light: No direct sunbeams hitting your face
- ✅ Morning or afternoon: Avoid harsh midday sun
- ✅ North-facing window: Most consistent light (no direct sun)
Step-by-Step Natural Light Setup
- 1. Find a large window with indirect daylight (not direct sunbeams)
- 2. Position yourself facing the window so light falls evenly on your face
- 3. Place white background behind you away from window (2-3 feet from you)
- 4. Have photographer stand between you and window
- 5. Optional: Hold white paper below chin to fill shadows
If you only have one usable window, move a little closer or farther until the light looks balanced on both sides of the face. Check your eyes, nose, and chin in the preview. A good setup should make your features look evenly lit without making your face look flat or washed out.
Pro Tip
If the window has curtains, use thin white curtains as a natural diffuser. This softens the light and eliminates harsh shadows while maintaining brightness.
Artificial Light Setup
When natural light is not available (evening, windowless room), you can create professional results with artificial lighting.
Artificial light takes a little more setup, but it gives you predictable results. That is helpful if you are taking photos at night or in a room where window light changes too much. The main rule is simple: use soft, even light from the front, not a single bright bulb from above.
Two-Light Setup (Best Results)
- • Position: Two lights at 45-degree angles, one on each side of camera
- • Height: Slightly above eye level
- • Distance: 3-4 feet from subject
- • Power: Both lights at equal brightness
- • Diffusion: Use white paper or fabric in front of lights
Equipment Options
| Equipment | Cost | Quality | Best For |
|---|---|---|---|
| Ring Light | ₹500-2000 | ⭐⭐⭐⭐⭐ | Best overall |
| Desk Lamps (x2) | ₹200-500 | ⭐⭐⭐⭐ | Budget option |
| LED Panels (x2) | ₹1000-3000 | ⭐⭐⭐⭐⭐ | Professional |
| Ceiling Light Only | Free | ⭐⭐ | Not recommended |
Bulb Selection
- Color temperature: 5000K-6500K (daylight white)
- Brightness: 800-1000 lumens per bulb minimum
- Type: LED bulbs preferred (no heat, consistent color)
- Avoid: CFL bulbs (flickering), tungsten (too warm)
If you only have one strong lamp, soften it with a white cloth, tracing paper, or a thin curtain placed in front of the light source. That diffusion helps prevent bright hotspots on the forehead and nose while keeping the face evenly visible.
Avoiding Shadows
Shadows are the number one cause of passport photo rejection. There are two types to avoid:
The easiest way to think about shadow control is to check two places separately: your face and the wall behind you. A photo can still be rejected if your face looks fine but your shadow is clearly visible on the background. Both areas need clean, even light.
Face Shadows
- ❌ Shadow on one side of face
- ❌ Shadow under nose
- ❌ Shadow under chin
- ❌ Dark eye sockets
Fix: Face light source directly, use fill light or reflector
Background Shadows
- ❌ Your shadow on wall behind
- ❌ Dark areas on background
- ❌ Uneven background brightness
Fix: Stand 2-3 feet away from background
The Reflector Technique
A simple white reflector (cardboard, foam board, or even white paper) can eliminate shadows dramatically. Hold it below your chin, angled upward, to bounce light into shadowy areas. This fills under-chin shadows and lightens eye sockets.
If you are shooting alone, place the reflector on a table or chair just below the camera line. Even a white bedsheet, notebook page, or foam board can help bounce a little extra light back into the face and reduce the dark look that makes photos feel unfinished.
Best Time of Day for Photos
Time of day matters because sunlight changes color and intensity throughout the day. The most practical approach is to choose the part of the day when the light is steady, bright, and soft enough to avoid hard shadows.
| Time | Light Quality | Recommendation |
|---|---|---|
| Early Morning (6-8 AM) | Warm, angled | ⚠️ Okay |
| Mid-Morning (9-11 AM) | Bright, neutral | ✅ Excellent |
| Midday (12-1 PM) | Harsh, overhead | ⚠️ Avoid if sunny |
| Afternoon (2-4 PM) | Bright, neutral | ✅ Excellent |
| Late Afternoon (5-7 PM) | Warm, golden | ⚠️ Color cast |
| Overcast Any Time | Soft, diffused | ✅ Ideal |
If you are using window light, test your setup for a minute before taking the final shot. The light can shift faster than expected, especially near sunset. A quick test image will tell you whether you need to move the chair, open curtains, or switch to artificial light.
Troubleshooting Common Problems
Most lighting problems are small setup issues, not major technical failures. If a photo looks wrong, change one thing at a time: distance from the window, direction of the light, or the brightness of the lamps. That makes it easier to see what actually fixed the problem.
Problem: Photo looks too dark
Solutions: Move closer to window, use brighter bulbs, open curtains fully, add additional light sources, ensure light is in front of you not behind.
Problem: Photo looks washed out/overexposed
Solutions: Move away from direct sunlight, add sheer curtains, reduce artificial light brightness, avoid standing in direct sunbeam.
Problem: Photo has yellow/orange tint
Solutions: Use daylight bulbs (5000K+), turn off warm indoor lights, use natural light instead, adjust white balance in camera settings.
Problem: One side of face looks brighter
Solutions: Move the light source closer to the camera axis, use a second lamp on the darker side, or bounce light from a white reflector so both sides of the face look more balanced.
Budget-Friendly Lighting Setup
You do not need studio gear to get a passport photo that passes. A clean room, a bright window, and a few white surfaces are often enough. The key is to make the light look soft and consistent rather than expensive.
Free Setup (Natural Light)
- 1. Large window with daylight
- 2. White bedsheet as background
- 3. White paper/cardboard as reflector
- 4. Smartphone on timer or tripod
- Total cost: ₹0
Budget Artificial Setup
- 1. 2x desk lamps with LED bulbs (₹400)
- 2. White chart paper as diffusers (₹20)
- 3. White chart paper as background (₹20)
- 4. Phone tripod/stand (₹300)
- Total cost: ~₹750
If you are choosing between spending money on a ring light or using what you already own, start with the cheapest setup that gives you even light. A plain, workable photo is better than a fancy setup that introduces glare, harsh contrast, or strange color.
Frequently Asked Questions
What is the best light for passport photos?
Natural daylight from a large window is ideal for passport photos. Face the window directly for soft, even lighting without harsh shadows. Overcast days provide the most flattering light as clouds act as a natural diffuser.
Can I use camera flash for passport photos?
Avoid using flash as it creates harsh shadows, red-eye, and uneven lighting that often results in rejection. Flash also causes reflections on glasses and creates an unflattering, washed-out appearance. Use continuous natural or artificial light instead.
How do I avoid shadows on my face in passport photos?
Face the light source directly so your entire face is evenly illuminated. Stand 2-3 feet away from the background to prevent your shadow from appearing on it. Use a reflector (white cardboard or paper) to fill in shadows under your chin and eyes.
What color temperature should I use for artificial light?
Use bulbs with 5000K-6500K color temperature (daylight white). This produces natural-looking skin tones and accurate colors. Avoid warm yellow bulbs (2700K-3000K) as they create an orange tint, and avoid cool blue lights that make skin look pale.
Is a ring light good for passport photos?
Yes, ring lights are excellent for passport photos. They provide even, shadow-free lighting on your face. Position the ring light at eye level and sit 2-3 feet away from it. The circular reflection in your eyes is also flattering and professional.
Why does my passport photo look yellow or orange?
This happens when using indoor tungsten bulbs (warm white). These bulbs emit orange-tinted light. Switch to daylight-balanced bulbs (5000K+) or use natural window light. You can also adjust white balance in your camera settings to compensate.
What time of day is best for passport photos?
Mid-morning (9-11 AM) and mid-afternoon (2-4 PM) provide the best natural light. Avoid harsh midday sun and very early/late times when light comes at an angle. Overcast days are ideal as the cloud cover creates soft, diffused lighting.
How do I prevent glare on glasses when taking passport photos?
Position your light source slightly above and to the sides rather than directly in front. Tilt your head very slightly downward to angle the glasses away from direct light. Using diffused lighting (through a white sheet or curtain) also reduces glare.
Can I take passport photos at night with artificial light?
Yes, but you need proper setup. Use at least two light sources on either side of your face at 45-degree angles. Ensure both lights are the same color temperature. Diffuse the lights with white fabric or paper to avoid harsh shadows.
What causes dark circles under eyes in passport photos?
Overhead-only lighting (like ceiling lights) casts shadows downward into the eye sockets. Add a front-facing light source at eye level, or use a reflector (white paper) below your face to bounce light upward and fill in under-eye shadows.
Got Good Lighting? Create Your Photo
Set up your lighting and create your passport photo for free.
Create Free Passport Photo →Next practical step
After reading the guide, open the matching tool or reference page so capture, crop, upload, and print prep stay in the right order.
Create Your Passport Photo
Make a 35x45mm photo, download a digital file, or create a print-ready sheet.
Create Photo Free →