Biometric Passport Photo Specifications
Understand biometric requirements to ensure your photo passes automated verification at immigration checkpoints.
Quick answer
A biometric passport photo is a photo that can be reliably read by facial-recognition systems. In simple terms, the face must be centered, the eyes must be clear, the expression must be neutral, and the file must be sharp enough for machine verification.
The goal is not artistic quality. The goal is predictability. If the machine can locate your face, measure it correctly, and compare it without confusion, the photo is much more likely to pass.
What is a Biometric Photo?
A biometric passport photo is designed to be read by facial recognition systems and other biometric technology. These photos follow strict international standards (ICAO) to ensure they work with automated border control systems worldwide.
You can think of biometric compliance as the technical side of passport photography. The photo still needs to look like a normal document image, but it also has to work as data: face shape, eye line, distance, background, and clarity all matter.
ICAO Standards
ICAO (International Civil Aviation Organization) sets global standards for passport photos. Key requirements:
- Face position: Centered, facing forward
- Expression: Neutral, mouth closed
- Eyes: Open, looking at camera
- Head coverage: 70-80% of frame
- Resolution: Minimum 300 DPI
These rules exist because passports are used in many countries and at many checkpoints. A standardized face photo reduces the chance that lighting, crop, or pose will interfere with automated matching.
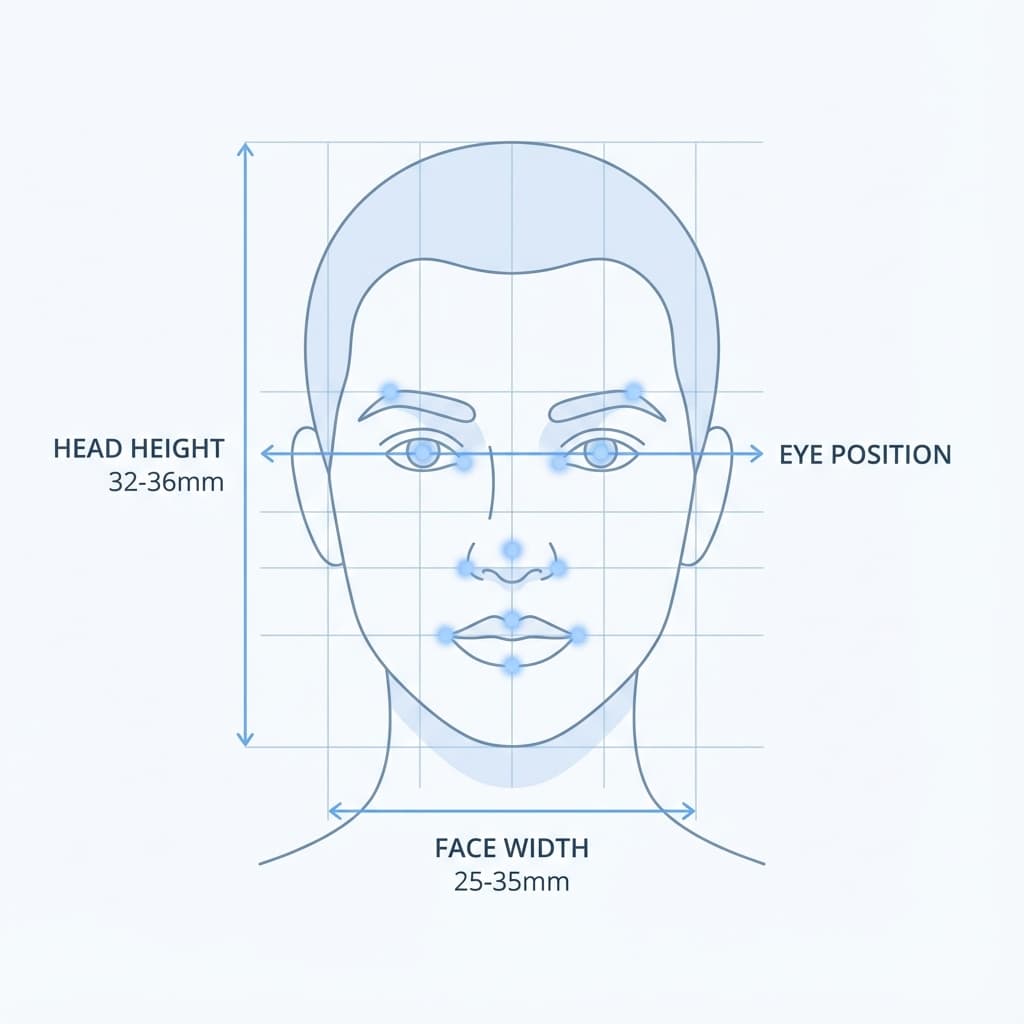
Technical Requirements
The technical side of biometric photography can sound complicated, but the basics are straightforward. Keep the face measurable, the image sharp, and the frame clean. Anything that makes facial features harder to read raises the risk of rejection.
| Face Coverage | 70-80% of photo height |
| Eye Line | Centered horizontally |
| Eye Position | 1/3 to 1/2 from top |
| Head Tilt | Maximum 5 degrees |
| Inter-pupil Distance | Minimum 90 pixels |
| Focus | Sharp, especially on eyes |
A good rule of thumb is that the eyes should remain the strongest visual anchor in the photo. If the eyes are blurry, hidden, or poorly lit, the rest of the biometric data becomes much less useful.
Face Recognition Guidelines
Facial recognition works best when the subject looks directly at the camera and keeps the head steady. Tiny changes in angle can change the way the face is measured, especially around the jawline, eyes, and nose bridge.
For Best Results
- ✅ Keep face straight toward camera
- ✅ Neutral expression, relaxed face
- ✅ Both ears visible (if possible)
- ✅ Eyes wide open and clearly visible
- ✅ Hair away from face
Avoid These
- ❌ Tilted or rotated head
- ❌ Smiling or expressions
- ❌ Squinting or half-closed eyes
- ❌ Glare on glasses
- ❌ Hair covering forehead or eyes
How to Capture It Correctly
The best biometric photo is usually the one that is captured with simple, even light and no dramatic editing. Stand still, face the camera directly, and use a plain background so the system can focus on your face instead of the surroundings.
- Place the camera at eye level so the face stays natural and level.
- Use soft daylight or balanced indoor lighting.
- Keep the chin level and the shoulders relaxed.
- Avoid beauty filters, sharpening filters, or face-smoothing effects.
- Review the file at full size before exporting it.
| Check | Why it matters |
|---|---|
| Eye sharpness | The system needs clear landmarks for matching |
| Head symmetry | Rotation can distort biometric measurements |
| Background simplicity | Reduces false edge detection |
| Even lighting | Prevents shadows that hide facial detail |
Common Issues That Fail Biometric Checks
Most biometric failures happen because something in the image makes the face harder to detect. That can be a physical issue like shadow or glare, or a technical issue like low resolution or compression artifacts.
- Head rotation: Even slight tilt causes failure
- Eyes not visible: Blocked by hair, glasses glare
- Expression: Smiling changes face geometry
- Shadows: Interfere with face detection
- Low resolution: Can't extract facial features
What the System Checks First
Biometric software usually starts with the biggest and clearest signals in the image. It looks for the general face outline, the eye line, the symmetry of the head, and whether the photo contains enough clean detail to build a reliable comparison. If any of those elements are weak, the rest of the image becomes less useful.
That is why a photo can look acceptable to a human but still underperform in machine checks. A person may forgive a slightly soft background or a mild shadow, while a biometric engine may treat the same issue as a meaningful obstacle. The safest strategy is to keep the image simple from the start, not to depend on post-editing.
| Signal | Why it matters |
|---|---|
| Face outline | Helps the system find the subject quickly |
| Eye position | Supports alignment and measurement |
| Head symmetry | Reduces false matches caused by angle changes |
| Image clarity | Allows facial features to be read accurately |
How to Avoid Over-Editing
Over-editing is one of the easiest ways to ruin an otherwise good biometric photo. Excessive skin smoothing, heavy sharpening, bright filters, face reshaping, or aggressive background replacement can make the image look artificial. Even if the final file is technically large enough and square enough, the details may no longer match a real human face well.
Keep edits gentle. Adjust only what is necessary to meet the document rule, such as crop, brightness, or background cleanliness. If you can still recognize the natural texture of the face and the photo still looks like a normal passport image, you are probably in a safer range.
A good habit is to compare the edited version to the original before saving. If the edited file looks much more polished than the source, it may also be less reliable for biometric verification.
Quick Check
PassportSizePhoto.in automatically validates biometric compliance and adjusts positioning. For related reading, see resolution guide and expression rules.
If you want to understand the broader photo rules too, photo requirements and dimensions are useful companion pages.
Practical Examples
Think of biometric compliance in terms of outcomes. A front-facing photo with a plain background, even light, and open eyes will usually perform better than a more stylish image that includes shadows, tilt, or a busy background. The system is not trying to judge beauty or presentation; it is trying to identify the same person with as few ambiguities as possible.
If you have to choose between a flattering photo and a simple one, choose the simple one. A document photo should be boring in the best possible way. That is usually the sign that it is doing its job well.
Frequently Asked Questions
What makes a photo biometric-compliant?
A biometric photo meets ICAO standards for machine-readability: correct face position, neutral expression, sharp focus, and proper dimensions for automated verification.
What are ICAO standards?
ICAO (International Civil Aviation Organization) sets global passport photo standards to ensure photos work with facial recognition systems at borders.
Why is neutral expression required?
Facial recognition algorithms are calibrated for neutral expressions. Smiling or other expressions can change face geometry and cause verification failures.
Does biometric compliance mean the photo must look unnatural?
No. Biometric compliance simply means the photo should be clear, neutral, and easy for systems to read. Natural lighting and a relaxed face still matter.
Can biometric rules differ by country?
Yes. The core ICAO logic is similar worldwide, but each country may add its own size or background rules on top of the biometric baseline.
Do glasses affect biometric checks?
They can, especially if there is glare or the frames block the eyes. Clear visibility of the eyes is the safest option.
What is the easiest way to test a biometric photo?
Check whether the face is centered, the eyes are sharp, the background is plain, and the image is not over-cropped or blurry.
Next practical step
After reading the guide, open the matching tool or reference page so capture, crop, upload, and print prep stay in the right order.
Create Your Passport Photo
Make a 35x45mm photo, download a digital file, or create a print-ready sheet.
Create Photo Free →