Passport Photo Rejected? Complete Fix Guide
Your passport photo was rejected? Don't panic. This comprehensive guide covers every rejection reason with step-by-step fixes to get your photo accepted on the next try.
Understanding Photo Rejection
Receiving a passport photo rejection can be frustrating, especially when you are in a hurry. But do not worry — photo rejection is common and fixable. Most issues can be resolved either by retaking the photo correctly or by using the right tools.
The Indian passport office follows strict ICAO (International Civil Aviation Organization) standards for passport photos. These standards ensure your photo works with biometric systems worldwide. Understanding exactly why your photo was rejected is the first step to fixing it.
In many cases, rejection is not a sign that the whole application is failing. It is simply a signal that one detail needs attention. Once you know whether the issue is size, background, lighting, expression, or file format, the correction usually becomes straightforward.
Time Impact
A photo rejection typically adds 1-2 weeks to your passport processing time. Getting it right the first time or fixing it quickly minimizes delays.
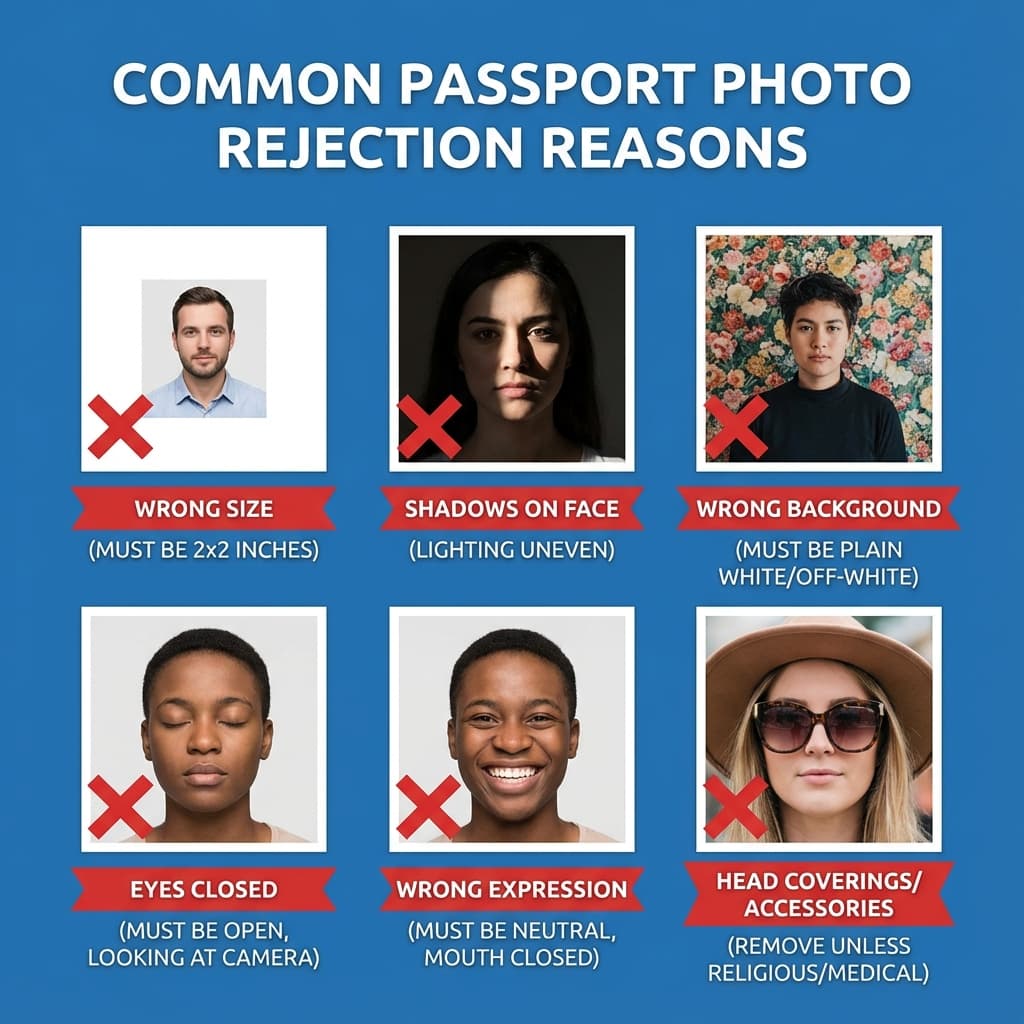
Common Rejection Reasons
Here are the most common reasons passport photos get rejected, along with how frequently they occur and how difficult they are to fix:
Some issues are technical and can be corrected digitally. Others require a fresh photo because they are built into the image itself. Knowing the difference saves time and prevents repeated resubmissions that do not solve the real problem.
If the rejection note is vague, start with the highest-probability issues first: size, background, lighting, and file format. Those are the most common reasons a compliant-looking photo still fails an automated or manual check.
| Issue | Description | Frequency | Fix |
|---|---|---|---|
| Wrong Size | Photo not exactly 35×45mm | Very Common | Easy |
| Background Color | Not white, has shadows, or patterns visible | Very Common | Easy |
| Face Shadows | Uneven lighting causing shadows on face | Common | Retake Needed |
| Glasses Glare | Reflection on lenses hiding eyes | Common | Retake Needed |
| Wrong Expression | Smiling, mouth open, not neutral | Common | Retake Needed |
| Eyes Closed | Eyes not fully open in photo | Moderate | Retake Needed |
| Head Position | Head tilted or not looking at camera | Moderate | Retake Needed |
| File Size | Digital file too large or too small | Common (Online) | Easy |
| Face Too Small | Face does not occupy 70-80% of frame | Moderate | Easy |
| Poor Quality | Blurry, pixelated, or low resolution | Moderate | Retake Needed |
How to Fix Each Issue
The safest way to fix a rejected passport photo is to address the exact reason listed in the notice. Do not guess. If the issue is background, edit the background. If the issue is shadows or expression, retake the photo with a better setup.
A good rule is to choose the smallest possible correction that solves the stated problem. If a background edit is enough, do not also change the face, crop, or colors unless those areas also caused rejection.
Wrong Size Fix
Use PassportSizePhoto.in to automatically resize your photo to exactly 35×45mm (630×810 pixels). Our tool ensures correct dimensions every time.
Background Fix
Our automatic background removal tool replaces any background with pure white. This fixes colored backgrounds, shadows, and patterns without needing to retake the photo.
Face Shadows Fix
Shadows on face require retaking. Position yourself facing a window with natural light or use multiple light sources to eliminate shadows. Avoid direct overhead lighting.
Glasses Glare Fix
Either remove glasses for the photo or tilt your head slightly to avoid reflections. Consider using anti-reflective coated lenses if available. Your eyes must be clearly visible.
File Size Fix
For Passport Seva portal, file size should be 10-250 KB. Our tool automatically compresses and optimizes your photo to the exact specifications required.
Poor Quality Fix
If the image is blurry or pixelated, retake it at a higher quality rather than trying to sharpen it heavily. A clean source photo is always easier to submit than an over-processed one.
How to Resubmit Your Photo
Once the problem is fixed, resubmission should be simple and focused. The main thing is to replace the rejected file with a corrected version and then confirm that the new image is the one actually attached to the application.
Online Application Resubmission
- 1. Log in to Passport Seva portal with your Application ID
- 2. Check the status section for rejection reason
- 3. Prepare a new photo addressing the specific issue
- 4. Upload the corrected photo using the resubmit option
- 5. Wait for re-verification (usually 1-3 business days)
PSK (Offline) Resubmission
- 1. Check your rejection notice for specific instructions
- 2. Get new physical photos printed (4-6 copies recommended)
- 3. Book a new PSK appointment if required
- 4. Bring original rejection notice and new photos
- 5. Submit at the designated counter
Keep a backup copy of the corrected photo in case the portal asks for another upload later. It is also useful to label the file clearly so you do not accidentally send the old rejected version again.
Prevent Future Rejections
The easiest rejection to fix is the one that never happens. A consistent setup, a careful review, and a proper compliant tool will save a lot of time on the backend.
Best Practices
- ✅ Use a verified tool: PassportSizePhoto.in automatically validates and corrects common issues
- ✅ Check all specifications: Size, background, file size before submitting
- ✅ Good lighting: Natural daylight, facing the light source
- ✅ Neutral expression: Mouth closed, looking directly at camera
- ✅ Recent photo: Taken within last 6 months
- ✅ Test upload: If possible, preview how the photo looks in the portal before final submission
A final human check is valuable too. Look at the photo at full size and ask whether it still looks like you, whether the background is clean, and whether the face is centered naturally. That extra minute can prevent another round of rejection.
Online vs Offline Rejection Differences
The fix process depends a little on how you applied. Online systems usually give faster feedback and easier resubmission. Offline reviews may involve more manual steps, but they can also provide clearer human guidance if something is wrong.
Online Applications
- • Automated checks for file size/dimensions
- • Faster rejection notification
- • Easier to resubmit from home
- • May be stricter on technical specs
Offline Applications
- • Manual verification by officers
- • May notice issues not caught online
- • Requires PSK visit for resubmission
- • More feedback on specific issues
In both cases, the strategy is the same: identify the root cause, correct only what is needed, and avoid making a bunch of unrelated edits that could introduce a new error.
Timeline and Processing Delays
Understanding how rejection affects your timeline helps you plan accordingly:
If you are on a deadline, prioritize the easiest fixes first. File size and background are usually faster to correct than expression or lighting, which often require a new capture. A quick response can keep the delay from spreading into the rest of the application timeline.
Typical Timeline Impact
- First rejection: +5-7 business days
- Second rejection: +5-7 additional business days
- Verification after resubmission: 1-3 business days
- If PSK revisit needed: +10-15 days (appointment availability)
These delays are not fixed in every case, but they are a good working estimate. The longer the issue stays unresolved, the more likely your file will sit idle waiting for correction.
Keep track of the exact message you received from the portal or counter. That note becomes your checklist for the next attempt and helps you avoid making the same mistake twice.
Frequently Asked Questions
Why was my passport photo rejected?
Common reasons include: incorrect size (not 35×45mm), non-white background, shadows on face or background, glasses glare covering eyes, wrong expression (smiling), eyes closed or partially visible, head tilted, file size too large or small for online upload, or poor image quality.
Can I use the same photo after fixing it digitally?
It depends on the issue. If the rejection was due to fixable issues like background color or file size, you can edit and resubmit the same photo. If the issue is with the photo itself (expression, glasses, shadows), you need to take a completely new photo.
How many times can I resubmit a rejected photo?
There is no official limit on resubmissions. However, repeated rejections delay your application significantly. Each rejection typically adds 1-2 weeks to processing time. It is better to use a verified tool to get it right the first time.
Will I get a refund if my photo is rejected?
Passport Seva fees are non-refundable, but photo rejection does not mean you lose your fees. You simply need to resubmit a correct photo. Your application remains active while you fix the photo issue.
Do I need to visit the Passport Seva Kendra for photo rejection?
For online applications, you can usually resubmit photos online. For offline applications or if you receive a notice, you may need to visit the PSK with new photos. Check your rejection notice for specific instructions.
What if my photo was rejected after the PSK visit?
If rejection happens post-verification, you will receive an email or SMS with instructions. Usually, you need to upload a new photo through the Passport Seva portal. In some cases, you may need to book another PSK appointment.
Can a studio photo get rejected?
Yes, professional studio photos can be rejected too. Studios may not always follow the latest specifications, or their lighting setup may create issues. Always verify the output meets current government requirements.
Is rejection more common for online or offline applications?
Online applications may see more rejections because the system automatically checks certain parameters. However, offline applications can also be rejected during manual verification. Using proper specifications prevents both.
What happens if I keep getting rejected?
If you face repeated rejections, consider visiting a reputed photo studio or using our tool which is specifically designed for Indian passport specifications. You can also contact Passport Seva helpline for guidance on what exactly is failing.
Does passport photo rejection affect my application permanently?
No, photo rejection does not create any permanent record or affect future applications. It is simply a request to provide a compliant photo. Once you submit a correct photo, the application proceeds normally.
Get It Right This Time
Use our tool to create a compliant photo and avoid another rejection.
Create Compliant Photo Free →Next practical step
After reading the guide, open the matching tool or reference page so capture, crop, upload, and print prep stay in the right order.
Create Your Passport Photo
Make a 35x45mm photo, download a digital file, or create a print-ready sheet.
Create Photo Free →