Digital Passport Photo Requirements
Complete guide to digital passport photo specifications for online applications. File format, size, dimensions for all major portals.
If you are uploading a photo for passport seva, visa processing, Aadhaar updates, or any other government form, the safest approach is to use a clean JPEG file with a plain background, even lighting, and a 35×45mm portrait crop that keeps your face centered. This page explains the practical rules that actually matter during upload, so you can avoid rejected files and unnecessary retries.
A good digital photo should feel ordinary in the best possible way. It should look like a normal, recent document image with no distracting shadows, no obvious filters, and no need for extra correction before it can be uploaded or printed. That keeps the file useful for both instant uploads and later reprints.
Small checks now save time later, especially when a portal gives a strict upload error with no clear explanation.
Digital upload
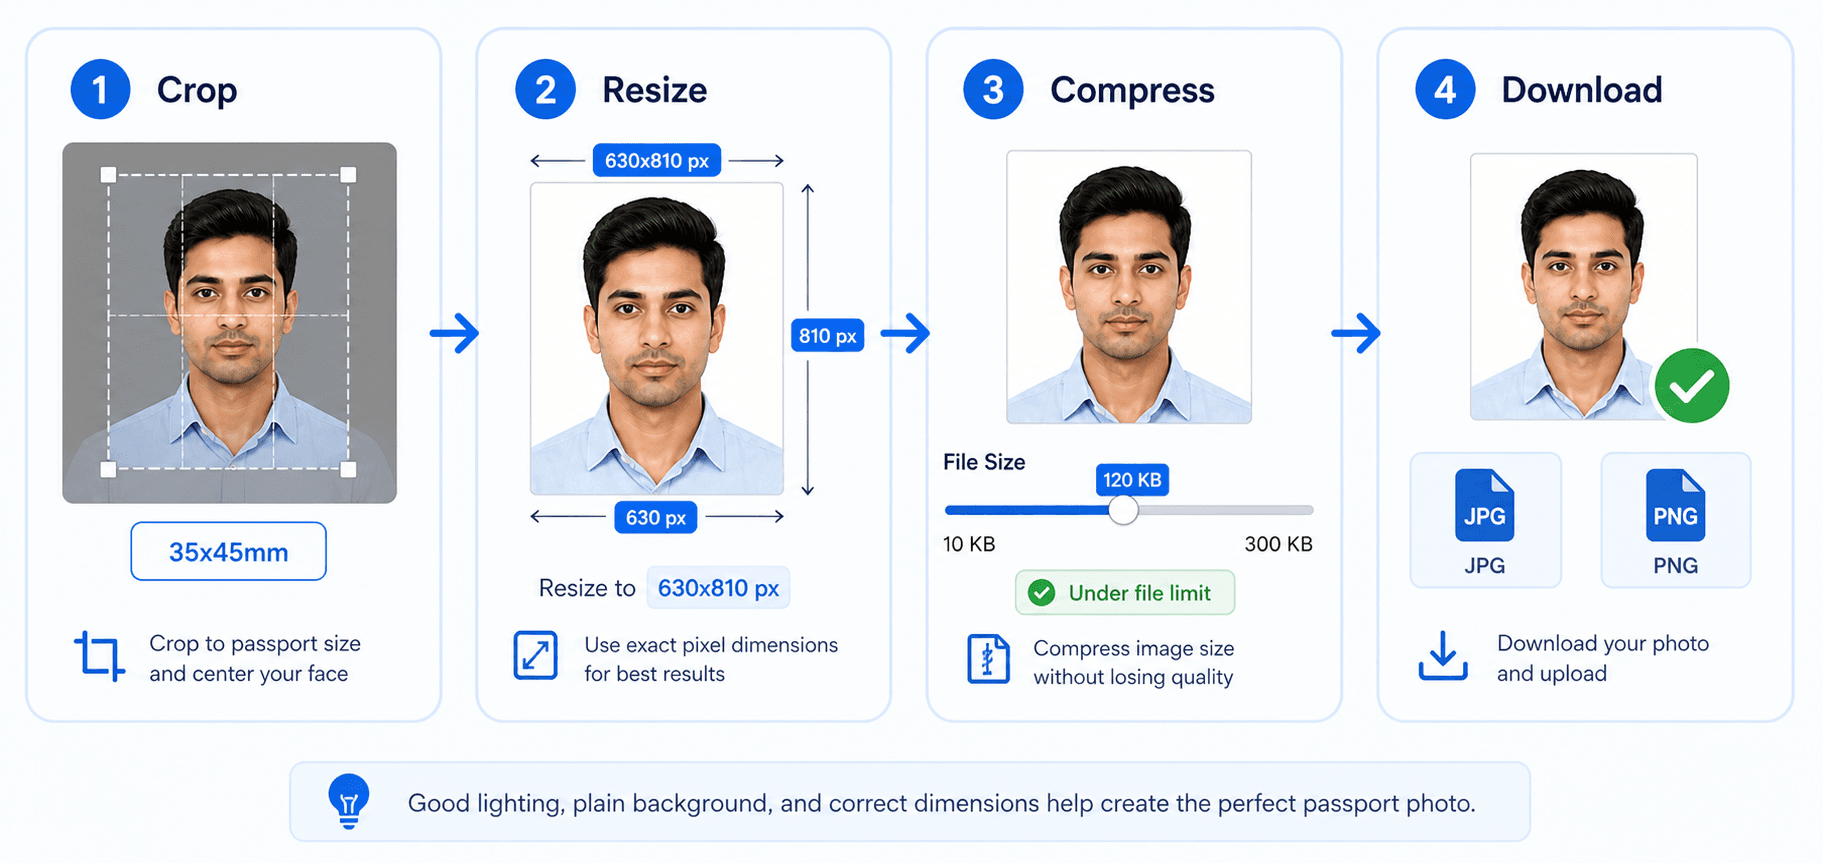
Crop, resize, compress, then download
For digital forms, the photo must satisfy both image dimensions and file-size limits. Resize first, then compress carefully so the face stays sharp and the file still uploads cleanly.
- Avoid repeated compression because it adds blur.
- Zoom in once before submission to check eyes and face edges.
- Use the exact file limit shown on your upload form.
Related next steps
Standard Digital Specifications
These numbers cover the most common upload rules you will see on Indian and international portals. When a portal gives a stricter limit, always follow that specific rule first, because the final check is usually based on file size, pixel count, and the clarity of the face.
The best file is usually not the largest file. It is the one that keeps the face crisp, the background clean, and the upload size under control. If all three line up, the photo tends to behave well on most portals without extra editing.
Portal-Specific Requirements
Different portals reject photos for different reasons. Some are strict about file size, some care more about dimensions, and some mainly fail images because the background is not plain enough or the photo has visible compression marks. The table below gives you a quick reference before upload.
If you are switching between passport, visa, and Aadhaar uploads, keep the same master image and only change the export settings that actually matter. That approach saves time and helps you avoid a new crop for every form you open.
When a portal allows a range, aim for the center of that range instead of the edge. Mid-range files are usually easier to open, easier to review, and less likely to trigger a warning about size or compression.
| Portal | Format | Size | Pixels | Notes |
|---|---|---|---|---|
| Passport Seva (India) | JPEG | 10-250 KB | 630×810 | Exact upload format |
| DS-160 (US Visa) | JPEG | ≤240 KB | 600x600 to 1200x1200 | No compression artifacts |
| UK Visa Online | JPEG | 50 KB - 10 MB | ≥600x750 | Rectangular allowed |
| Schengen Visa | JPEG | ≤500 KB | ≥413x531 | Varies by country |
| Aadhaar Update | JPEG | 10-250 KB | 630×810 | Check portal updates |
How to Create Digital Passport Photo
A good workflow starts with the source image. Make sure the eyes are open, the shoulders are level, and the background is even before you worry about compression. That sequence produces a much more reliable final file.
If you are taking the photo yourself, stand near soft daylight and keep the phone level with your eyes. That one habit usually creates a cleaner starting point than trying to rescue a poor image later.
- 1
Take or Upload Photo
Use a recent image with clear lighting, a plain wall behind you, and a neutral expression. A front-facing phone camera works well if you keep the frame steady and leave a little space around your head.
- 2
Select Output Format
Choose the exact portal or document type first. That setting controls the final crop, image ratio, and file size target, so it is the easiest way to avoid a mismatch later.
- 3
Download Optimized Photo
Download the final JPEG only after checking the preview. A good export keeps the photo sharp, compresses the file without obvious artifacts, and stays within the portal limit.
If you are preparing a file for a government portal, keep the original photo archived too. That way you can make a cleaner re-export later if the portal asks for a smaller file size or a slightly different crop.
When you save the final version, use a simple file name so it is easy to find later. Clear naming helps if you need to upload the same image again for a second form or another family member.
Once the preview looks balanced, trust the result and move on. Repeated micro-edits often make the file less natural and do not usually improve acceptance on the portal.
Common Issues & Solutions
Most upload problems come from tiny details, not from the face itself. A photo may look fine on screen but still fail if it is too large, too compressed, incorrectly cropped, or saved in a format the portal does not want. These quick fixes cover the most common mistakes.
The easiest fix is usually to make the photo a little cleaner rather than a little more aggressive. Preserve the natural face detail, reduce only the extra file weight, and keep the background smooth instead of trying to force the file down too much.
If the portal still rejects the file, go back to the source and check the crop first. A slight framing error is often easier to fix than a compression problem, and it is usually faster to correct early.
File Size Too Large
Lower the quality only a little, not too much. The goal is to reduce file size while keeping hair, eyes, and background edges clean enough for the portal to read clearly.
Wrong Dimensions
Reselect the document type and export again. If the portal wants a square image, avoid rectangular crops, because even a neat-looking photo can be rejected for ratio mismatch.
Upload Failing
Double-check the file extension and make sure the browser has not renamed the image in a strange way. If the upload still fails, try a new browser session and re-download the file once more.
Photo Rejected
Look for shadows, blurry edges, and bright spots on the face. Re-uploading the same weak image usually does not help; a cleaner source photo almost always gives a better result.
FAQ
What file format for digital passport photo?
JPEG/JPG is the safest default for most portals. PNG works on some forms, but avoid formats like BMP, GIF, or TIFF unless the portal explicitly allows them.
What is the file size limit?
For Passport Seva, keep the file between 10 KB and 250 KB in JPEG format.
What pixel dimensions are required?
For Indian passport digital upload, use exactly 630×810 pixels.
How to reduce passport photo file size?
Use our tool which automatically compresses to required size. Or use image editors to reduce quality slightly while maintaining clarity.
Can I use selfie for digital passport photo?
Yes, if it meets specifications: white background, proper lighting, neutral expression, correct dimensions.
What is DPI for digital photo?
DPI (dots per inch) should be 300 for standard quality. Higher DPI increases quality but also file size.
What color space should be used?
sRGB color space is standard for digital passport photos. Most cameras default to sRGB.
Passport Seva portal photo requirements?
JPEG format only, 10 KB - 250 KB file size, and exact 630×810 pixel dimensions.
Can signature and photo be in same file?
No, passport applications require separate files for photo and signature. Do not combine them.
Why is my digital photo getting rejected?
Common reasons: wrong size, wrong format, too large file, poor quality, background not white. Use our tool for compliant photos.